Tang Nano 9kでSoftCore noMMU-Linuxを動かしてみる
2023年10月26日
はじめに
規模が小さいFPGA(Tang Nano 9k)上でRISC-V SoftCore noMMU-Linuxに挑戦したので
その概要と構築手順をご紹介したいと思います。
Tang Nano 9kのスペック
| Logic Units (LUT4) | 8640 |
| Crystal oscillator | 27MHz |
| External SPI FLASH | 32Mbits SPI flash |
| SDR SDRAM(bits) | 64Mbits |
Tang Nano 9kは秋月電子通商さんで2,480円で販売されています。
主な修正内容
RegYMMさんが作成した No MMU Linux on 32-bit RISC-V のqemu riscv32 nommuを参考に
Litex VexRiscvで動作させる為に以下の実装を行い、Buildrootの外部設定ファイル(BR2_EXTERNAL)で構築できるようにしています。
- Linux Kernelはhttps://github.com/Dolu1990/litex-linux.git を使用
- M-Modeで動作させる
- OS Timer VexRiscvではCLINT timerが使用できないため、Timer0(drivers/clocksource/timer-litex.c)を作成
- Local Interrupt Controller(drivers/irqchip/irq-litex-vexriscv.c)をVexRiscv用に修正
- litex/tools/litex_json2dts_linux.pyを参考にDTSファイルの変換(litex_json2dts_linux_vexriscv.py)を作成
あと、参考までにArty-A7でもVexRiscvでNo MMU Linuxを動かしてみました。
準備するモノ
- Ubuntu 22.04.2 LTS
- GOWIN EDA
- Tang Nano 9k
- microSDカード
開発環境
GOWIN EDAのInstall 「gowin eda install」のキーワードでGoogle先生に教えてもらって下さい。
Litex構築環境Install 以下の手順でインストールして下さい、詳細は本家のLiteX を見てください。
$ wget https://github.com/enjoy-digital/litex/blob/master/litex_setup.py
$ chmod +x litex_setup.py
$ ./litex_setup.py --init --install --user
Tang Nano 9kのmain ramを8M(4M×2)に拡張する
未使用のHyperRAMを使用可能にする為に、litex_boards/targets/sipeed_tang_nano_9k.pyを修正する。
diff --git a/litex_boards/targets/sipeed_tang_nano_9k.py b/litex_boards/targets/sipeed_tang_nano_9k.py
index d154632..5ba5d45 100755
--- a/litex_boards/targets/sipeed_tang_nano_9k.py
+++ b/litex_boards/targets/sipeed_tang_nano_9k.py
@@ -117,6 +117,12 @@ class BaseSoC(SoCCore):
             self.hyperram = HyperRAM(hyperram_pads)
             self.bus.add_slave("main_ram", slave=self.hyperram.bus, region=SoCRegion(origin=self.mem_map["main_ram"], size=4*mB))

+            hyperram_pads1 = HyperRAMPads(1)
+            self.comb += ck[1].eq(hyperram_pads1.clk)
+            self.comb += ck_n[1].eq(~hyperram_pads1.clk)
+            self.hyperram2 = HyperRAM(hyperram_pads1)
+            self.bus.add_slave("main_ram2", slave=self.hyperram2.bus, region=SoCRegion(origin=0x40400000, size=4*mB))
+
         # Video ------------------------------------------------------------------------------------
         if with_video_terminal:
             self.videophy = VideoGowinHDMIPHY(platform.request("hdmi"), clock_domain="hdmi")
FPGA bitstreamデータの合成
Tang Nano 9k の場合
$ cd litex-boards/litex_boards/targets
$ ./sipeed_tang_nano_9k.py --timer-uptime --with-spi-sdcard \
  --csr-json tang_nano_9k_csr.json \
  --cpu-type vexriscv --cpu-variant linux --build
$ litex_json2dts_linux_vexriscv.py tang_nano_9k_csr.json > tang_nano_9k_csr.dts
build/sipeed_tang_nano_9k/の下に生成される以下のファイルをgowin programmerでTang Nano 9Kに書き込んで下さい。
gateware/sipeed\_tang\_nano\_9k.fs
software/bios/bios.bin
Arty_A7 の場合
$ cd litex-boards/litex_boards/targets
$ ./digilent_arty.py --variant a7-100 --timer-uptime --with-sdcard \
  --csr-json digilent_arty_a7_csr.json \
  --cpu-type vexriscv --cpu-variant linux --build
$ litex_json2dts_linux_vexriscv.py digilent_arty_a7_csr.json > digilent_arty_a7_csr.dts
BuildRootによるnoMMU-Linuxの構築
GitHub(https://github.com/regymm/buildroot) からBuildRootをcloneする
$ git clone https://github.com/regymm/buildroot
$ cd buildroot 外部設定ファイルを使って設定を行いBuildする
$ make list-defconfigs BR2_EXTERNAL=../litex-buildroot
$ make litex_vexriscv_riscv32_nommu_tang_nano_9k_defconfig
$ make -j$(nproc)
無事に成功すれば、output/images/loader.binが生成されます。
microSDカードの作成
- VFATでフォーマット(必ずMBRで)
- boot.jsonとloader.binをCopyする
boot.jsonの中は
{
"loader.bin":   "0x40000000"
}
起動
起動時のコンソール出力
Booting from boot.json...
Copying loader.bin to 0x40000000 (2456660 bytes)...
[########################################]
Executing booted program at 0x40000000

--============= Liftoff! ===============--
[    0.000000] Linux version 6.1.0-rc2 (developer@developer-Diginnos-PC) (riscv32-buildroot-linux-uclibc-gcc.br_real (Buildroot -g91b88fa1ad) 10.3.0, GNU ld (GNU Binutils) 2.37) #4 Wed Jul 19 12:29:47 JST 2023
[    0.000000] Forcing kernel command line to: earlycon console=liteuart
[    0.000000] earlycon: liteuart0 at MMIO 0xf0003800 (options '115200n8')
[    0.000000] printk: bootconsole [liteuart0] enabled
[    0.000000] Zone ranges:
[    0.000000]   Normal   [mem 0x0000000040000000-0x00000000407fffff]
[    0.000000] Movable zone start for each node
[    0.000000] Early memory node ranges
[    0.000000]   node   0: [mem 0x0000000040000000-0x00000000407fffff]
[    0.000000] Initmem setup node 0 [mem 0x0000000040000000-0x00000000407fffff]
[    0.000000] riscv: base ISA extensions im
[    0.000000] riscv: ELF capabilities im
[    0.000000] Built 1 zonelists, mobility grouping off.  Total pages: 2032
[    0.000000] Kernel command line: earlycon console=liteuart
[    0.000000] Dentry cache hash table entries: 1024 (order: 0, 4096 bytes, linear)
[    0.000000] Inode-cache hash table entries: 1024 (order: 0, 4096 bytes, linear)
[    0.000000] mem auto-init: stack:off, heap alloc:off, heap free:off
[    0.000000] Memory: 5620K/8192K available (1318K kernel code, 89K rwdata, 161K rodata, 825K init, 52K bss, 2572K reserved, 0K cma-reserved)
[    0.000000] NR_IRQS: 64, nr_irqs: 64, preallocated irqs: 0
[    0.000000] riscv-intc: 32 local interrupts mapped
[    0.000000] irqchip: LiteX VexRiscv irqchip driver initialized. IE: 0, mask: 0x00000000, pending: 0x00000000
[    0.000000] irqchip: LiteX VexRiscv irqchip settings: mask CSR 0xbc0, pending CSR 0xfc0
[    0.000000] clocksource: riscv_clocksource: mask: 0xffffffffffffffff max_cycles: 0x63a1e71a3, max_idle_ns: 440795203123 ns
[    0.001034] sched_clock: 64 bits at 27MHz, resolution 37ns, wraps every 4398046511093ns
[    0.085807] Console: colour dummy device 80x25
[    0.134120] Calibrating delay loop (skipped), value calculated using timer frequency.. 54.00 BogoMIPS (lpj=1350000)
[    0.183696] pid_max: default: 4096 minimum: 301
[    0.263117] Mount-cache hash table entries: 1024 (order: 0, 4096 bytes, linear)
[    0.310604] Mountpoint-cache hash table entries: 1024 (order: 0, 4096 bytes, linear)
[    1.555146] devtmpfs: initialized
[    3.671007] clocksource: jiffies: mask: 0xffffffff max_cycles: 0xffffffff, max_idle_ns: 95563022313750000 ns
[    3.715977] pinctrl core: initialized pinctrl subsystem
[    9.727478] clocksource: Switched to clocksource riscv_clocksource
[   24.939709] workingset: timestamp_bits=30 max_order=11 bucket_order=0
[   71.680548] LiteX SoC Controller driver initialized
[   72.106682] f0003800.serial: ttyLXU0 at MMIO 0x0 (irq = 0, base_baud = 0) is a liteuart
[   72.169812] printk: console [liteuart0] enabled
[   72.169812] printk: console [liteuart0] enabled
[   72.215336] printk: bootconsole [liteuart0] disabled
[   72.215336] printk: bootconsole [liteuart0] disabled
[   81.469837] Freeing unused kernel image (initmem) memory: 824K
[   81.506423] This architecture does not have kernel memory protection.
[   81.530644] Run /init as init process

------------------------
| VexRiscv nommu Linux |
------------------------
Mounting /proc
Starting shell
/ #
起動後のメモリ使用状況
/ # cat /proc/meminfo
MemTotal:           6444 kB
MemFree:            3088 kB
MemAvailable:       2648 kB
Buffers:               0 kB
Cached:             1428 kB
 (略)
最後に
今回はTang Nano 9kでnoMMU-Linuxを動作させましたが、main ramのアクセス速度が遅い事とL2キャッシュがない為、起動(Shellプロンプトが出るまで)に90秒近くかかり、あまりに遅くて途中でハングしたのかと思うぐらいです(>_<)
ちなみに、Arty-A7では快適に動きました!!
Tang Nano 9k(27MHz) main ramのアクセス速度 :
--========== Initialization ============--
Memtest at 0x40000000 (2.0MiB)...
  Write: 0x40000000-0x40200000 2.0MiB
   Read: 0x40000000-0x40200000 2.0MiB
Memtest OK
Memspeed at 0x40000000 (Sequential, 2.0MiB)...
  Write speed: 1.4MiB/s
   Read speed: 1.3MiB/s
起動時間を早くする為、クロック(sys clk)を上げてみましたが、38MHzが限界でした。
実用レベルにするには、もうひと工夫が必要そうです。
| sys clk | 起動時間 | メモリテスト |
|---|---|---|
| 27MHz | 約90秒 | Read 1.3MiB |
| 38MHz | 約60秒 | Read 2.0MiB |
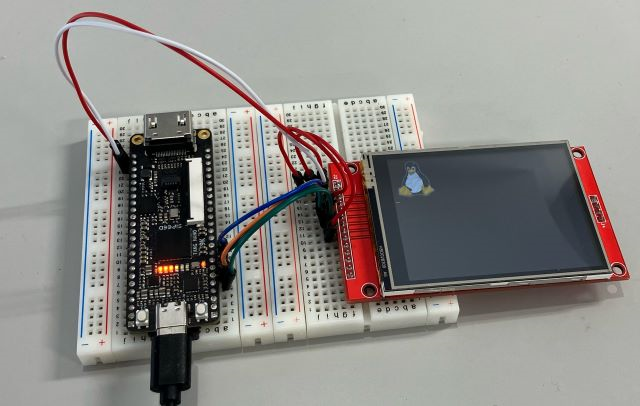
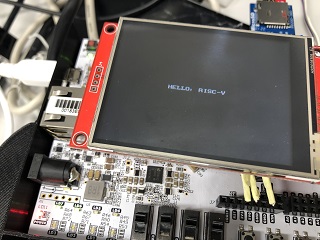
おまけ
SPIドライバやLCDパネルドライバを組み込めば、TFT液晶モジュールをフレームバッファとして動作させることも出来ます。